
Managing orders end-to-end
- Home
- Managing orders end-to-end
Introduction
Order management often relies on context, whether it’s shipping, order line management, or target sales channel. In this guide, we walk you through it step by step so you can be sure you’re not missing anything and can run your activity as smoothly as possible.
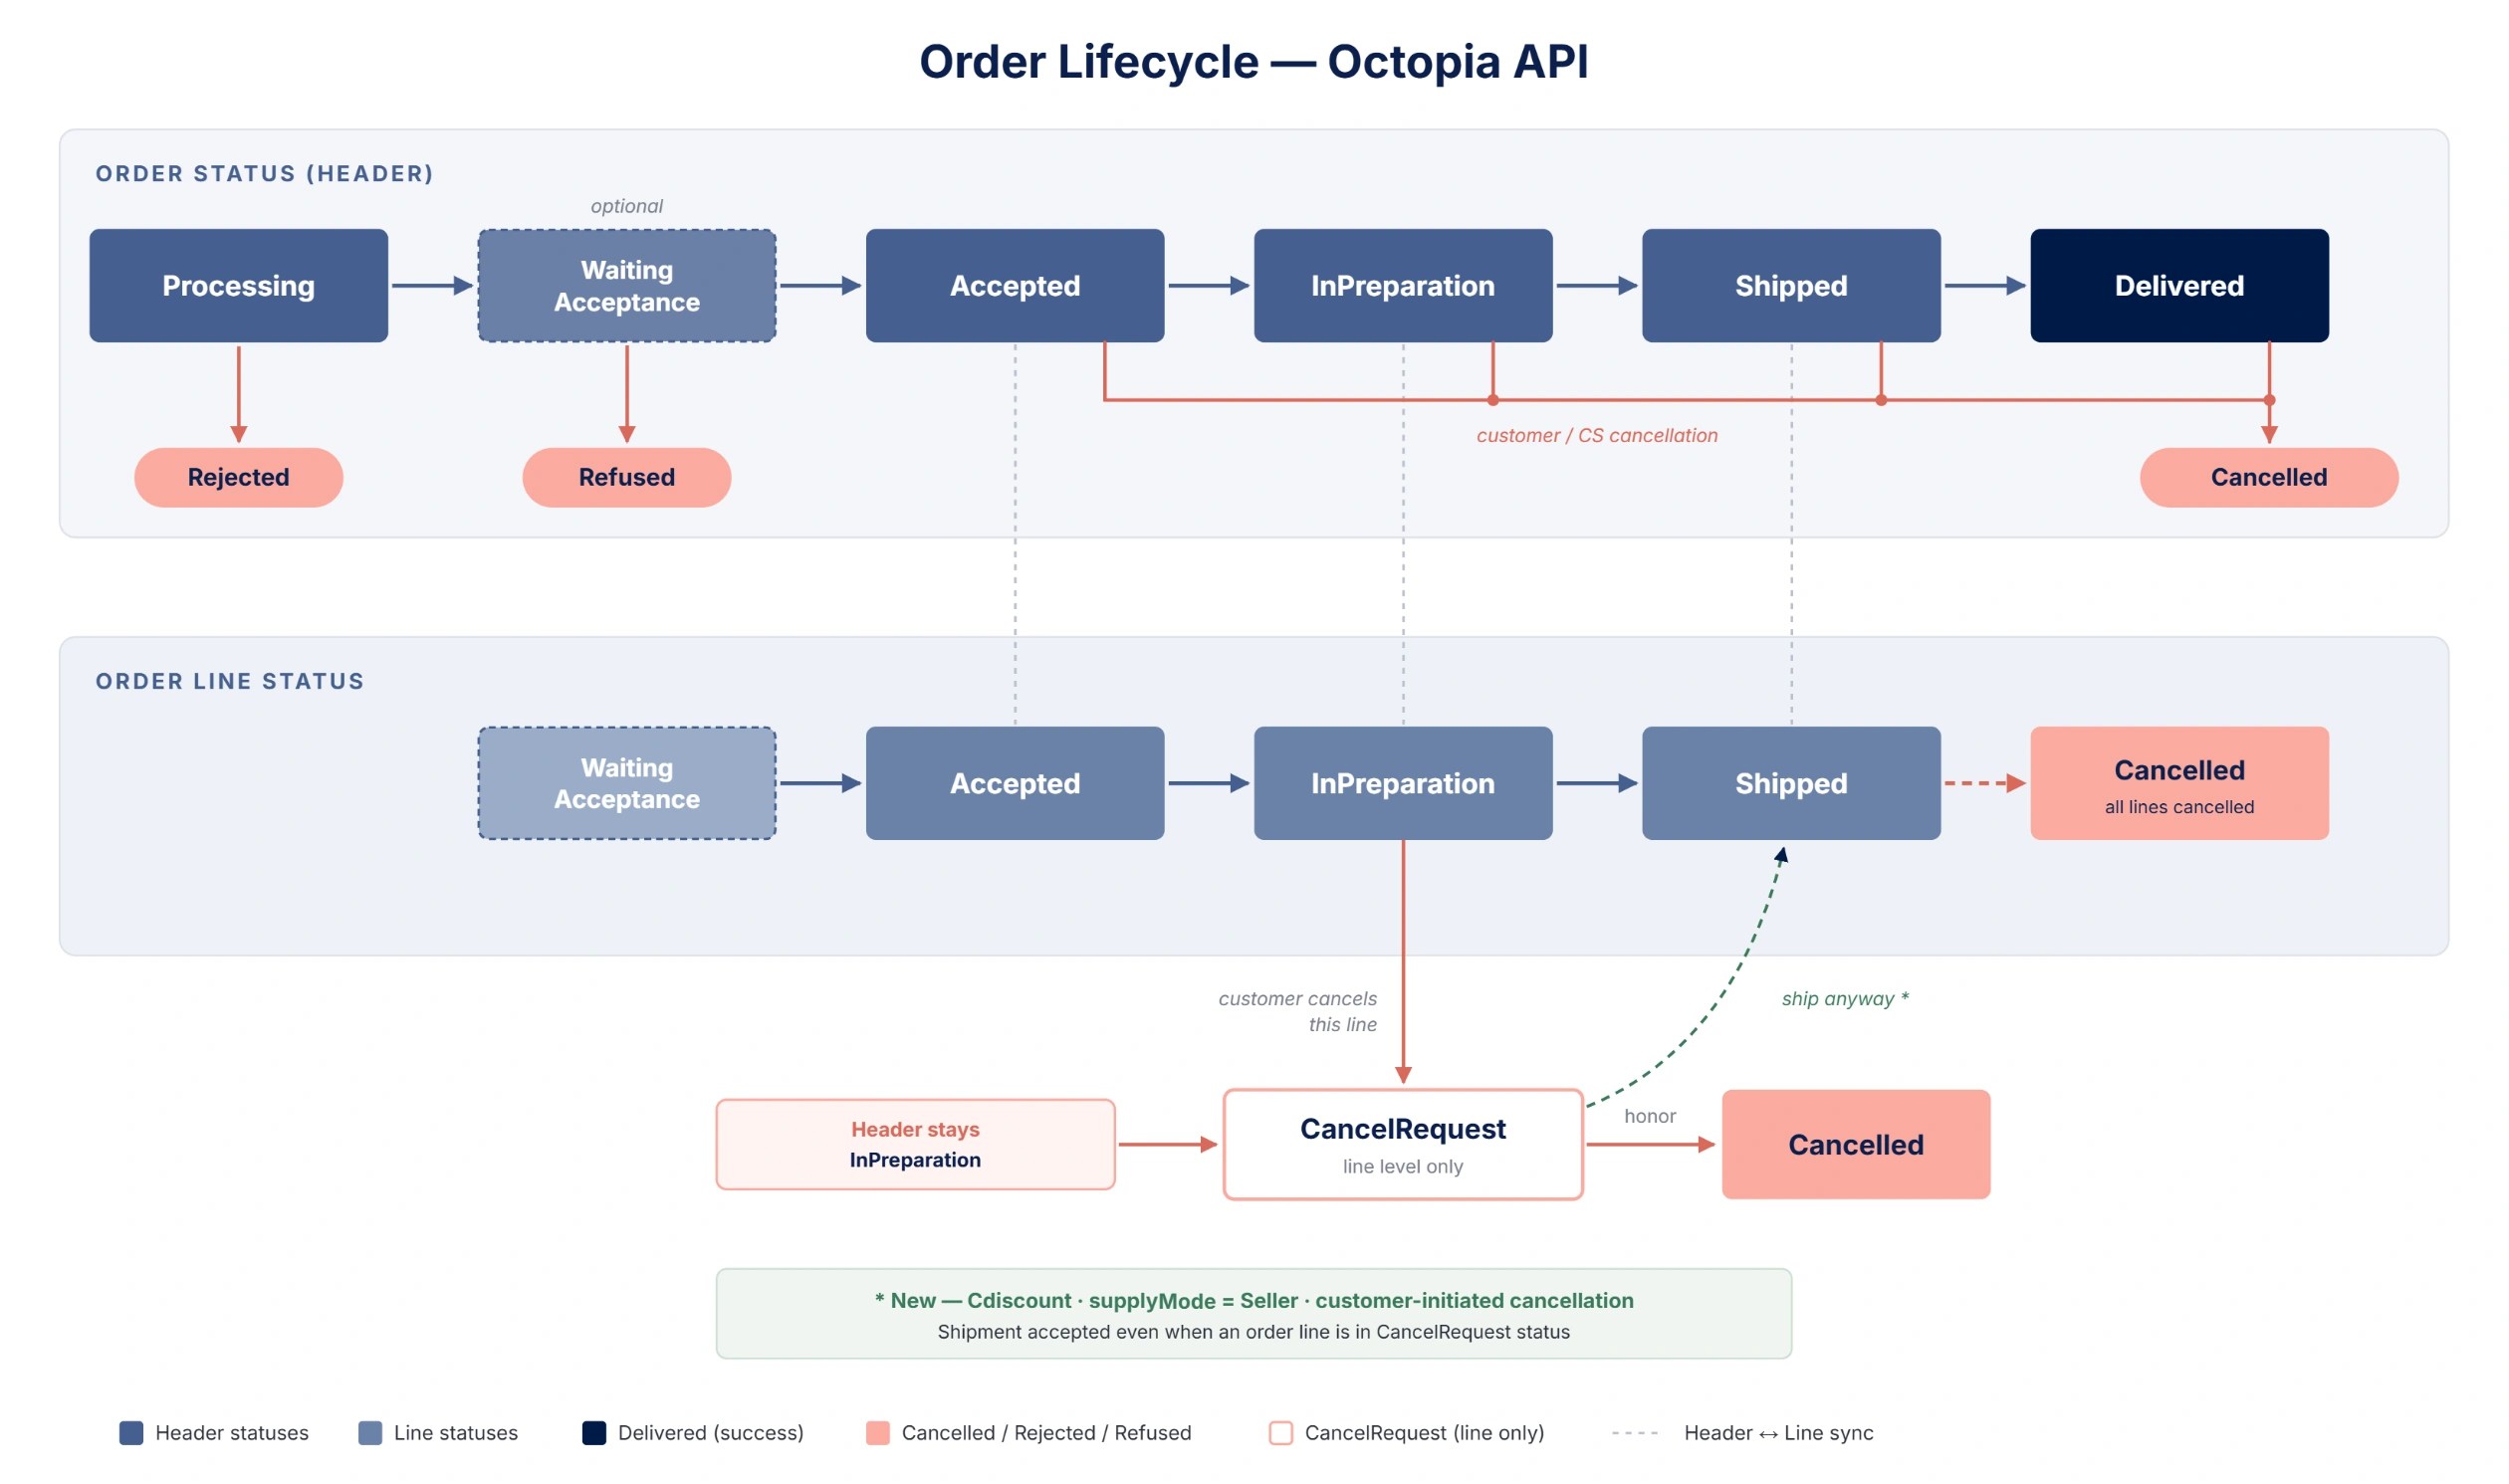
To do that, we put a particular focus on the end-to-end order workflow — from the moment an order reaches you, all the way to financial settlement. Before diving in, keep two structuring concepts in mind, as they condition almost everything that follows:
-
supplyMode (
SellervsFulfillment) — determines who drives the statuses and who ships the order. -
Order line management — some sales channels let you act at the line level (partial shipment or refusal), others only at the whole-order level.
1. Retrieve and follow your orders
In this section we’ll see how to retrieve your orders and keep track of them.
Goal: make sure you collect every order without missing a single one.
-
1.1 Count orders —
GET /orders/count: estimate a volume by status without pulling the details (e.g. how manyInPreparationtoday). Useful for building a front-office dashboard or managing your indicators.
Retrieve the total count of all orders matching the request parameters
Functional Rules:
-
You can query on multiple sales channel using comma separated values
-
Filters are restrictive, if you don't provide a filter then no filtering is applied on this field
Example:
-
Retrieve the count of orders
InPreparationfor the sales channelSELLZZ:/orders/count?salesChannelId=SELLZZ&status=InPreparation -
Retrieve the count of orders
ShippedorDeliveredsince the first of march 2023 for the sales channelSELLZZ:/orders/count?salesChannelId=SELLZZ&status=Shipped,Delivered&updatedAtMin=2023-03-01T00:00:00.000Z
Endpoint full URL: https://api.octopia-io.net/seller/v2/orders/count
Parameters - Headers
| Name | In | Type | Description |
|---|---|---|---|
| SellerId* | header |
string
|
Octopia Seller Identifier. Example : 98979 |
Parameters - Query
| Name | In | Type | Description |
|---|---|---|---|
| reference | query |
string
|
Seller reference for the ressource. Example : 0223258 |
| salesChannelId | query |
string|null
|
The Identifier of the sales channel Example : SELLZZ |
| businessOrder | query |
boolean
|
Gets whether order is for business |
| status | query |
string|enum|null
|
The status of the ressource. Example : InPreparation Available values : ["Processing", "WaitingAcceptance", "Accepted", "Refused", "InPreparation", "Shipped", "Delivered", "Cancelled", "Rejected"] |
| supplyMode | query |
string|enum
|
The identifies the logistic process used to ship the order item.
Example : Seller Available values : ["Seller", "Fulfillment", "Xdock"] |
| shippingCountry | query |
string
|
The shipping country code. Example : FR |
| updatedAtMin | query |
string
|
The updated at minimum date of orders. Example : 2023-12-25T14:30:00Z |
| updatedAtMax | query |
string
|
The updated at maximum date of orders. Example : 2023-12-25T15:30:00Z |
| createdAtMin | query |
string
|
The created at minimum date of the ressource. Example : 2023-12-25T14:30:00Z |
| createdAtMax | query |
string
|
The created at maximum date of the ressource. Example : 2023-12-25T15:30:00Z |
| shippedAtMin | query |
string
|
The shipped at minimum date of orders. Example : 2023-12-25T14:30:00Z |
| shippedAtMax | query |
string
|
The shipped at maximum date of orders. Example : 2023-12-25T15:30:00Z |
Response codes
200 - Successful response with the count of orders matching the criteriaapplication/json |
||||||||||||||||
400 - Bad Requestapplication/problem+json |
||||||||||||||||
401 - Unauthorizedapplication/problem+json |
||||||||||||||||
403 - Forbiddenapplication/problem+json |
||||||||||||||||
500 - An internal server error occurredapplication/problem+json |
-
1.2 List orders with filters —
GET /orders: the central use case. It supports rich filtering, pagination and sorting.-
Identity / channel:
reference,salesChannelId,businessOrder. -
Status & logistics:
status,supplyMode,shippingCountry. -
Date ranges:
createdAtMin/Max,updatedAtMin/Max,shippedAtMin/Max. -
Pagination & sorting:
pageIndex,pageSize(max 100) —GET /ordersuses page-based pagination (no cursor).sorttakes one or more date fields (createdAt,updatedAt,shippedAtMax);desctakes the field name(s) to sort in descending order (not a boolean) — e.g.sort=updatedAt&desc=updatedAt. -
Poll intelligently. Octopia doesn’t offer webhooks, callbacks or push notifications: you retrieve orders by polling
GET /ordersregularly. To do it without missing data or overloading the API, leverage the filters above: useupdatedAtMinto fetch only what changed since your last poll, paginate fully, poll at reasonable intervals (e.g. every 5–10 minutes for orders), and run a periodic full snapshot alongside incremental polling to catch any missed update. See Best Practices (#webhooks-and-polling) for the full strategy. Concrete examples:-
To retrieve the orders from the last few days, use
updatedAtMin/updatedAtMaxso you’re sure to catch everything updated in that window. -
To retrieve the orders you need to ship, filter on
status=InPreparationandsupplyMode=Seller.
-
-
Example call: With this call you retrieve the orders from the last few days on Cdiscount that you need to ship to the customer, sorted from the most recent to the oldest.
-
/orders?salesChannelId=CDISFR&status=InPreparation&supplyMode=Seller&updatedAtMin=2026-09-01T00:00:00Z&sort=updatedAt&desc=updatedAt&pageIndex=1&pageSize=100
Use this method to retrieve a list of orders using a set of filters.
Functional Rules:
-
You may filter your search by adding the following criteria in your request body:
-
A list of order
status -
An order reference
-
Is a business order
-
A shipping country
-
A supply mode
-
A sales channel identifier
-
A time range on order creation using
createdAtMin/createdAtMax -
A time range on order update using
updatedAtMin/updatedAtMax -
A time range on order shipping using
shippedAtMin/shippedAtMax
-
-
You may also sort your search by date using the following fields:
-
createdAt -
updatedAt -
shippedAtMax
-
-
To ensure a faster answer, the number of items retrieved per page is limited to 100 items maximum.
-
For orders with supply mode =
Fulfillment, the shipping address of an order line is only available once the order has reached one of the following statuses:Shipped,Delivered,CancelledorCancelRequest(i.e., after it has been shipped by our Fulfillment service). -
For orders having supply mode =
Seller, the shipping address of an order line is only available once the line has reached one of the following statuses:InPreparation,Shipped,Delivered,CancelledorCancelRequest.
Examples:
-
Retrieve orders without filters:
/orders?pageIndex=1&pageSize=100 -
Retrieve orders sorted by
createdAtby ascending order:/orders?pageIndex=1&pageSize=100&sort=createdAt -
Retrieve orders sorted by
createdAtby ascending order,updatedAtby descending order and filtered using a list of status:/orders?pageIndex=1&pageSize=100&sort=createdAt&desc=updatedAt&status=Accepted,Shipped
Endpoint full URL: https://api.octopia-io.net/seller/v2/orders
Parameters - Headers
| Name | In | Type | Description |
|---|---|---|---|
| SellerId* | header |
string
|
Octopia Seller Identifier. Example : 98979 |
Parameters - Query
| Name | In | Type | Description |
|---|---|---|---|
| reference | query |
string
|
Seller reference for the ressource. Example : 0223258 |
| salesChannelId | query |
string|null
|
The Identifier of the sales channel Example : SELLZZ |
| businessOrder | query |
boolean
|
Gets whether order is for business |
| status | query |
string|enum|null
|
The status of the ressource. Example : InPreparation Available values : ["Processing", "WaitingAcceptance", "Accepted", "Refused", "InPreparation", "Shipped", "Delivered", "Cancelled", "Rejected"] |
| supplyMode | query |
string|enum
|
The identifies the logistic process used to ship the order item.
Example : Seller Available values : ["Seller", "Fulfillment", "Xdock"] |
| shippingCountry | query |
string
|
The shipping country code. Example : FR |
| updatedAtMin | query |
string
|
The updated at minimum date of orders. Example : 2023-12-25T14:30:00Z |
| updatedAtMax | query |
string
|
The updated at maximum date of orders. Example : 2023-12-25T15:30:00Z |
| createdAtMin | query |
string
|
The created at minimum date of the ressource. Example : 2023-12-25T14:30:00Z |
| createdAtMax | query |
string
|
The created at maximum date of the ressource. Example : 2023-12-25T15:30:00Z |
| shippedAtMin | query |
string
|
The shipped at minimum date of orders. Example : 2023-12-25T14:30:00Z |
| shippedAtMax | query |
string
|
The shipped at maximum date of orders. Example : 2023-12-25T15:30:00Z |
| pageIndex | query |
integer
|
The index of the current page of items Default : 1 Example : 1 |
| pageSize | query |
integer
|
Maximum number of items to return per page. Default : 50 Example : 50 |
| sort | query |
string
|
Ascending sort Example : asc:createdAt |
| desc | query |
string
|
Descending sort Example : desc:createdAt |
Response codes
200 - Successapplication/json
|
||||||||||||||||||||||||||||||||||||||||||||||||||||||||||||||||||||||||||||||||||||||||||||||||||||||||||||||||||||||||||||||||||||||||||||||||||||||||||||||||||||||||||||||||||||||||||||||||||||||||||||||||||||||||||||||||||||||||||||||||||||||||||||||||||||||||||||||||||||||||||||||||||||||||||||||||||||||||||||||||||||||||||
400 - Bad Requestapplication/problem+json |
||||||||||||||||||||||||||||||||||||||||||||||||||||||||||||||||||||||||||||||||||||||||||||||||||||||||||||||||||||||||||||||||||||||||||||||||||||||||||||||||||||||||||||||||||||||||||||||||||||||||||||||||||||||||||||||||||||||||||||||||||||||||||||||||||||||||||||||||||||||||||||||||||||||||||||||||||||||||||||||||||||||||||
401 - Unauthorizedapplication/problem+json |
||||||||||||||||||||||||||||||||||||||||||||||||||||||||||||||||||||||||||||||||||||||||||||||||||||||||||||||||||||||||||||||||||||||||||||||||||||||||||||||||||||||||||||||||||||||||||||||||||||||||||||||||||||||||||||||||||||||||||||||||||||||||||||||||||||||||||||||||||||||||||||||||||||||||||||||||||||||||||||||||||||||||||
403 - Forbiddenapplication/problem+json |
||||||||||||||||||||||||||||||||||||||||||||||||||||||||||||||||||||||||||||||||||||||||||||||||||||||||||||||||||||||||||||||||||||||||||||||||||||||||||||||||||||||||||||||||||||||||||||||||||||||||||||||||||||||||||||||||||||||||||||||||||||||||||||||||||||||||||||||||||||||||||||||||||||||||||||||||||||||||||||||||||||||||||
500 - An internal server error occurredapplication/problem+json |
-
1.3 Retrieve an order by its ID —
GET /orders/{orderId}: for back-office detail display, issue resolution, delivery tracking.
Use this method to get a specific order details, using the orderId as parameter.
Functional Rules:
-
For orders with supply mode =
Fulfillment, the shipping address of an order line is only available once the order has reached one of the following statuses:Shipped,Delivered,CancelledorCancelRequest(i.e., after it has been shipped by our Fulfillment service). -
For orders having supply mode =
Seller, the shipping address of an order line is only available once the line has reached one of the following statuses:InPreparation,Shipped,Delivered,CancelledorCancelRequest.
Example:
-
Get the order with id
SCID123456789:/orders/SCID123456789
Endpoint full URL: https://api.octopia-io.net/seller/v2/orders/{orderId}
Parameters - Headers
| Name | In | Type | Description |
|---|---|---|---|
| SellerId* | header |
string
|
Octopia Seller Identifier. Example : 98979 |
Parameters - Path
| Name | In | Type | Description |
|---|---|---|---|
| orderId* | path |
string
|
The order unique identifier in Octopia's system. Example : SCID123456789 |
Response codes
200 - Successful response with a single order detailsapplication/json |
||||||||||||||||||||||||||||||||||||||||||||||||||||||||||||||||||||||||||||||||||||||||||||||||||||||||||||||||||||||||||||||||||||||||||||||||||||||||||||||||||||||||||||||||||||||||||||||||||||||||||||||||||||||||||||||||||||||||||||||||||||||||||||||||||||||||||||||||||||||||||||||||||||||||||||||||||||||||||
401 - Unauthorizedapplication/problem+json |
||||||||||||||||||||||||||||||||||||||||||||||||||||||||||||||||||||||||||||||||||||||||||||||||||||||||||||||||||||||||||||||||||||||||||||||||||||||||||||||||||||||||||||||||||||||||||||||||||||||||||||||||||||||||||||||||||||||||||||||||||||||||||||||||||||||||||||||||||||||||||||||||||||||||||||||||||||||||||
403 - Forbiddenapplication/problem+json |
||||||||||||||||||||||||||||||||||||||||||||||||||||||||||||||||||||||||||||||||||||||||||||||||||||||||||||||||||||||||||||||||||||||||||||||||||||||||||||||||||||||||||||||||||||||||||||||||||||||||||||||||||||||||||||||||||||||||||||||||||||||||||||||||||||||||||||||||||||||||||||||||||||||||||||||||||||||||||
404 - Not foundapplication/problem+json |
||||||||||||||||||||||||||||||||||||||||||||||||||||||||||||||||||||||||||||||||||||||||||||||||||||||||||||||||||||||||||||||||||||||||||||||||||||||||||||||||||||||||||||||||||||||||||||||||||||||||||||||||||||||||||||||||||||||||||||||||||||||||||||||||||||||||||||||||||||||||||||||||||||||||||||||||||||||||||
500 - An internal server error occurredapplication/problem+json |
Important note:
-
Only orders with supplyMode = Seller are to be shipped by the seller. Orders in Fulfillment are handled by the warehouse.
-
Best practice:
GET /ordersreturns as much info asGET /orders/{id}→ favor the list, avoid unitary calls.
Links: Orders Management
You are now set to process the orders that require action.
2. Validate / accept an order
In this section we’ll see how to confirm or refuse an order on Cdiscount (other sales channels are all in automatic validation).
Goal: ensure orders that require your validation are accepted in time so they can move on to preparation — and avoid letting them expire.
-
2.1 Understand when validation is required — this concerns Cdiscount only, for orders in
WaitingAcceptance. If the seller doesn’t validate, the order may expire. -
2.2 Accept or refuse —
POST /orders/{orderId}/approval-status(Accepted/Refused). Accepting does not mean ship. From here the order will follow these steps:Accepted→ marketplace controls →InPreparation(eligible for shipment). Example payload (accept):
  {
    "approval_status": "Accepted"
  }
Use this method to validate a specific order.
Endpoint full URL: https://api.octopia-io.net/seller/v2/orders/{orderId}/approval-status
Parameters - Headers
| Name | In | Type | Description |
|---|---|---|---|
| SellerId* | header |
string
|
Octopia Seller Identifier. Example : 98979 |
Parameters - Path
| Name | In | Type | Description |
|---|---|---|---|
| orderId* | path |
string
|
The order unique identifier in Octopia's system. Example : SELLZZ210525142759UT8E |
Request body
|
List of validation request for the given order. A request may contain several lines validation of the order. application/json |
Response codes
201 - Created. |
||||||||||||||||
400 - Bad Requestapplication/problem+json |
||||||||||||||||
401 - Unauthorizedapplication/problem+json |
||||||||||||||||
403 - Forbiddenapplication/problem+json |
||||||||||||||||
404 - Not Foundapplication/problem+json |
||||||||||||||||
409 - Conflictapplication/problem+json |
||||||||||||||||
500 - Internal Server Errorapplication/problem+json |
-
2.3 Automate validation — you can enable auto-approval from the Octopia Seller Portal (OSP), for those who don’t want to handle this via API.
Important note: after acceptance, order cancellation changes (some cancellation-reasons become restricted).
Links: Orders Management
3. Understanding Shipping Address and Delivery modes
In this section we’ll see where and how an order must be delivered — including when the shipping address becomes available and which delivery modes apply.
Goal: know exactly when the shipping address becomes available and which delivery mode applies, so you prepare and ship each order correctly.
-
3.1 Shipping address availability
Note — upcoming change.
The shipping address is currently returned by the API at every order status. In an upcoming release, address availability will be restricted so that the line’s address is only returned at the statuses that actually require it — for order preparation and shipping. Plan your integration so it doesn’t rely on the address being present at statuses where it isn’t needed (e.g. Refused, WaitingAcceptance).
Target behaviour (once the change is live):
In Seller: the line’s address will be available once the line is in InPreparation.
In Fulfillment: the address will be available after shipment by the Fulfillment service.
-
3.2 Delivery modes — the base grid (from Best Practices / delivery-logistics):
-
Small parcels (<30kg):
TrackedHomeDelivery(mandatory everywhere),SignedHomeDelivery,ExpressHomeDelivery,NotTrackedHomeDelivery. -
Large parcels (P30):
FixedDateHomeDelivery,SpecificRoomHomeDelivery,WithSetupHomeDelivery. -
Pickup points: Mondial Relay, La Poste, etc. (expose
pickupId/pickupName). -
Availability varies per sales channel (some modes are Cdiscount only).
-
Important note: delivery mode values are case sensitive. Also, Standard and Express will be removed in the next major version.
Links: Best Practices
You are now ready to ship orders
4. Shipping an order
In this section we’ll see how to declare the shipment of an order, including the multiline, multi-parcel and large-parcel cases.
Goal: confirm your shipments correctly and on time so downstream processes (customer notification, invoicing, commission) run smoothly.
-
4.1 Shipment prerequisites — order in
InPreparation, at least one line inInPreparation(orCancelRequest, see 6), supplyMode = Seller (not Fulfillment). Call must be made before carrier pickup and can only be made once; it cannot be updated afterwards.
-
4.2 Declare a shipment —
POST /orders/{orderId}/shipments: provide carrier + parcel number(s), tracking URL (optional but recommended). Triggers customer notification, invoicing, commission calculation. Example payload (single parcel):
  [
    {
      "parcelNumber": "PARCEL-001",
      "carrierName": "Chronopost",
      "trackingUrl": "https://track.example.com/PARCEL-001"
    }
  ]
Use this method to ship a specific order, or order lines.
Functional Rules:
- Please note that this endpoint should only be called for orders or order lines with the
InPreparationstatus and a supplyMode equal toSeller
Example:
-
To create a new shipment for the order with id
SCID123456789:/orders/SCID123456789/shipments
Endpoint full URL: https://api.octopia-io.net/seller/v2/orders/{orderId}/shipments
Parameters - Headers
| Name | In | Type | Description |
|---|---|---|---|
| SellerId* | header |
string
|
Octopia Seller Identifier. Example : 98979 |
Parameters - Path
| Name | In | Type | Description |
|---|---|---|---|
| orderId* | path |
string
|
The order unique identifier in Octopia's system. Example : SCID123456789 |
Request body
|
List of parcels for the given order. A parcel may contain several products of the order (e.g. small products shipped in one parcel), or a product may be shipped in several parcels (e.g. large products). application/json |
Response codes
201 - Successful response after creating a shipment for an order |
||||||||||||||||
400 - Bad Requestapplication/problem+json |
||||||||||||||||
401 - Unauthorizedapplication/problem+json |
||||||||||||||||
403 - Forbiddenapplication/problem+json |
||||||||||||||||
404 - Not foundapplication/problem+json |
||||||||||||||||
409 - Conflictapplication/problem+json |
||||||||||||||||
500 - An internal server error occurredapplication/problem+json |
-
4.3 Multiline & partial shipments — when the sales channel allows line-level management: ship one line today, another tomorrow; ability to refuse a single line. If not allowed: full-order shipment only. Full shipment (all order lines in one parcel):
  [
    {
      "parcelNumber": "PARCEL-001",
      "carrierName": "Chronopost",
      "trackingUrl": "https://track.example.com/PARCEL-001",
      "orderLineIds": ["LINE1", "LINE2", "LINE3"]
    }
  ]
Partial shipment (some order lines only):
  [
    {
      "parcelNumber": "PARCEL-002",
      "carrierName": "Colissimo",
      "trackingUrl": "https://track.example.com/PARCEL-002",
      "orderLineIds": ["LINE1"]
    }
  ]
Multiple parcels for a single order line — you can associate the same orderLineId with several parcels, if the item is shipped in parts or through different carriers:
  [
    {
      "carrierName": "LaPoste",
      "orderLineIds": ["AYGC", "BFCD"],
      "parcelNumber": "PARCEL1",
      "trackingUrl": "http://tracking.example.com/PARCEL1"
    },
    {
      "carrierName": "DPD",
      "orderLineIds": ["BFCD"],
      "parcelNumber": "PARCEL2",
      "trackingUrl": "http://tracking.example.com/PARCEL2"
    },
    {
      "carrierName": "Chronopost",
      "orderLineIds": ["BFCD"],
      "parcelNumber": "PARCEL3",
      "trackingUrl": "http://tracking.example.com/PARCEL3"
    }
  ]
In this example, line AYGC ships in 1 parcel (PARCEL1) and line BFCD ships across 3 (PARCEL1, PARCEL2, PARCEL3), each with its own carrier and tracking URL. Useful for oversized products, separate warehouse routing, or multi-part packaging.
4.4 Track the shipment — once the order (or line) moves to Shipped, the parcel data is populated on each order line under lines[].parcels[], readable via GET /orders (or GET /orders/{orderId}).
Each entry holds parcelNumber, carrierName, trackingUrl and trackingId — the tracking URL you (or the Fulfillment service) supplied at shipment.
Note this is declarative shipment data, distinct from the detailed carrier tracking timeline exposed by GET /parcel-trackings (a separate Fulfillment route with per-event statuses like InTransit/Delivered, refreshed every ~8h).
Important note: you can only ship order lines in InPreparation status with supplyMode = Seller and must ship all avaible lines at once when line management is not enabled
Links: Orders Management
5. Handling order cancellations
In this section we’ll see how to cancel or refund an order, and how to handle a customer-initiated cancellation request on a line (including the CancelRequest case).
Goal: process cancellations correctly, and know when you can still ship a line despite a pending cancellation request.
-
5.1 Retrieve eligible reasons — `GET /cancellation-reasons`: the available reasons depend on the order status and the user type. Call it before any cancellation request (parameters `salesChannel`, `userType`, `orderStatus`).
Allows to filter the list of reasons to only include those applicable for the given order status.
Functional Rules:
- The cancellation reasons returned depend on the order status provided in parameter.
Example:
-
Retrieve cancellation reasons for shipped orders with sales channel ID
SELLZZ, user typeSellerand order statusShipped:/cancellation-reasons?salesChannel=SELLZZ&userType=Seller&orderStatus=Shipped
Endpoint full URL: https://api.octopia-io.net/seller/v2/cancellation-reasons
Parameters - Headers
| Name | In | Type | Description |
|---|---|---|---|
| SellerId* | header |
string
|
Octopia Seller Identifier. Example : 98979 |
Parameters - Query
| Name | In | Type | Description |
|---|---|---|---|
| salesChannel | query |
string|null
|
The Identifier of the sales channel Example : SALESC |
| userType | query |
string|enum|null
|
The type of user Example : Seller Available values : ["Customer", "Seller", "SalesChannel", "CustomerCareService"] |
| orderStatus | query |
string|enum
|
Allows to filter the list of reason to only include those applicable for the given order status. Example : Accepted Available values : ["Accepted", "InPreparation", "Shipped", "Delivered"] |
Response codes
200 - Successful response with the list of cancellation reasonsapplication/json |
||||||||||||||||
400 - Bad Requestapplication/problem+json |
||||||||||||||||
401 - Unauthorizedapplication/problem+json |
||||||||||||||||
403 - Forbiddenapplication/problem+json |
||||||||||||||||
500 - Server Errorapplication/problem+json |
-
5.2 Full cancellation —
POST /order-cancellation-requests: cancels the whole order. Not allowed if one or more lines are already cancelled; for Fulfillment lines, only when they areShippedorDelivered. Once accepted, the order moves toCancelledand the refund is triggered. You can choose whether or not to refund the shipping costs (shippingCostRefund). Example payload:{ "orderSellerId": "SELLZZ210525142759UT8E", "reason": "customer-claim", "shippingCostRefund": true }
This API is used to send a full cancellation request:
Functional Rules:
-
You can call
Get /cancellation-reasonsendpoint before calling this method to get eligible reasons for cancellation based on the order status. -
You can choose to refund the shipping costs or not.
-
You cannot create a full cancellation request on an order with one or more lines already cancelled.
-
Note that the cancellation reasons that can be used "depends" on the order status
-
In case of an order with a Fulfillment line(s), cancellation is only possible if the line(s) status is/are either
ShippedorDelivered, otherwise the cancellation will be rejected -
Once the cancellation request is accepted, the status of the order changes to
Cancelledand the seller's refund is triggered.
Example:
-
To create a new order cancellation request:
/order-cancellation-requests
Endpoint full URL: https://api.octopia-io.net/seller/v2/order-cancellation-requests
Parameters - Headers
| Name | In | Type | Description |
|---|---|---|---|
| SellerId* | header |
string
|
Octopia Seller Identifier. Example : 98979 |
Request body
|
The order and reason for cancellation application/json |
Response codes
201 - Successful response after creating a total cancellation requestapplication/jsonLinks:
|
||||||||||||||||
400 - Bad Requestapplication/problem+json |
||||||||||||||||
401 - Unauthorizedapplication/problem+json |
||||||||||||||||
403 - Forbiddenapplication/problem+json |
||||||||||||||||
409 - Conflictapplication/problem+json |
||||||||||||||||
500 - Server Errorapplication/problem+json |
-
5.3 Partial cancellation —
POST /order-partial-cancellation-requests: cancels one or more specific lines, each with its own reason (retrieved viaGET /cancellation-reasons). Example payload:{ "orderSellerId": "cmd_FFM_001", "lines": [ { "lineId": "1", "offerId": "f546", "reason": "reference-mistake", "shippingCostRefund": true } ] }
This API is used to request a partial cancellation.
Functional Rules:
-
Before calling this API you must retrieve the cancellation reason from the
Get /cancellation-reasons -
Note that the cancellation reason that can be used depends on the order line status
-
In case of an order with a Fulfillment line(s), cancellation is only possible if the line(s) status is/are either
ShippedorDelivered, otherwise the cancellation will be rejected -
If you do not want to request the refund of shipping costs, you must express your choice in the property
shippingCostRefund, and usefalseas value.
Example:
-
To create a new order partial cancellation request:
/order-partial-cancellation-requests
Endpoint full URL: https://api.octopia-io.net/seller/v2/order-partial-cancellation-requests
Parameters - Headers
| Name | In | Type | Description |
|---|---|---|---|
| SellerId* | header |
string
|
Octopia Seller Identifier. Example : 98979 |
Request body
|
The list of lines to cancel on the given order alongside their reasons application/json |
Response codes
201 - Successful response after creating a partial cancellation requestapplication/jsonLinks:
|
||||||||||||||||||
400 - Bad Requestapplication/problem+json |
||||||||||||||||||
401 - Unauthorizedapplication/problem+json |
||||||||||||||||||
403 - Forbiddenapplication/problem+json |
||||||||||||||||||
409 - Conflictapplication/problem+json |
||||||||||||||||||
500 - Server Errorapplication/problem+json |
-
5.4 CancelRequest line state and global Order state — order line status
CancelRequest: a cancellation request initiated by the customer. The header staysInPreparation.
-
5.5 Accept or refuse the request — either you honor it (the line moves to `Cancelled`), or you ship anyway, which amounts to refusing the customer’s withdrawal.
-
5.6 Cancellation sources — Cancellation can come from multiple sources: `Customer`, `Seller`, `SalesChannel`, `Fulfillment`.
Important note: shipping a line in CancelRequest is only allowed on Cdiscount, with supplyMode = Seller, when the cancellation was initiated by the customer.
Links: Orders Management
If cancellation is not relevant :
6. Make a commercial gesture
In this section we’ll see how to grant a commercial gesture to a customer who had an issue with their order — this is different from cancelling an order: a commercial gesture does not cancel the order, it compensates the customer while the order stands.
Goal: compensate a customer for an inconvenience on a shipped or delivered order, within the limits your sales channel allows.
-
6.1 Check the remaining allowance — `GET /orders/{orderId}/commercial-gestures-available-amounts`: returns the maximum amount still applicable (the max allowance minus gestures already granted, with cancelled lines deducted) and the total of gestures already made. Call it before creating a request to avoid a rejection.
This API allows you to retrieve the maximum allowable commercial gesture amount for a given order. It provides both the maximum amount that can be applied as a commercial gesture and the amounts of any previous commercial gestures applied to the order.
Functional Rules:
-
The maximum allowable commercial gesture is calculated by subtracting the previously granted commercial gestures from the maximum commercial gesture amount as well as any cancelled line of the order.
Example:
Max commercial gesture = €40 (Refer to Post /order-commercial-gesture-requests for details on calculating this amount). Sum of previous commercial gestures = €17. Max allowable commercial gesture = €40€ - €17 = €23`
-
In case of a Cdiscount order the maximum allowable commercial gesture amount will include refunds, and may not match with the commercial gestures sum.
Example:
-
To get the maximum allowable commercial gesture amount for the order with
orderIdSCID123456789:/orders/SCID123456789/commercial-gestures-available-amounts
Endpoint full URL: https://api.octopia-io.net/seller/v2/orders/{orderId}/commercial-gestures-available-amounts
Parameters - Headers
| Name | In | Type | Description |
|---|---|---|---|
| SellerId* | header |
string
|
Octopia Seller Identifier. Example : 98979 |
Parameters - Path
| Name | In | Type | Description |
|---|---|---|---|
| orderId* | path |
string
|
The order unique identifier in Octopia's system. Example : SCID123456789 |
Response codes
200 - Successapplication/json |
||||||||||||||||
400 - The order does not existsapplication/problem+json |
||||||||||||||||
401 - Unauthorizedapplication/problem+json |
||||||||||||||||
403 - Forbiddenapplication/problem+json |
||||||||||||||||
500 - Internal server errorapplication/problem+json |
-
6.2 Check eligibility & limits —
GET /sales-channel-commercial-gesture-configurations/{salesChannelId}: confirm the option is enabled for the sales channel and read the maximum gesture amount available for the order.
Retrieve the sales channel commercial gesture configuration
Functional Rules:
-
The
maximumAmountis the largest flat gesture you can do on an order. -
The
maximumRateis the largest amount relative to order price you can do on an order. -
The total gesture calculation cannot exceed the value given by the following rules:
Max(order price + maximumAmount, order price * maximumRate)
Example:
-
To get the sales channel commercial gesture configuration for sales channel
SALESC:/sales-channel-commercial-gesture-configurations/SALESC
Endpoint full URL: https://api.octopia-io.net/seller/v2/sales-channel-commercial-gesture-configurations/{salesChannelId}
Parameters - Headers
| Name | In | Type | Description |
|---|---|---|---|
| SellerId* | header |
string
|
Octopia Seller Identifier. Example : 98979 |
Parameters - Path
| Name | In | Type | Description |
|---|---|---|---|
| salesChannelId* | path |
string
|
The sales channel identifier Example : SELLZZ |
Response codes
200 - Successful response with commercial gesture configuration for a sales channelapplication/json |
||||||||||||||||
401 - Unauthorizedapplication/problem+json |
||||||||||||||||
403 - Forbiddenapplication/problem+json |
||||||||||||||||
500 - Server Errorapplication/problem+json |
-
6.3 Request a commercial gesture —
POST /order-commercial-gesture-requests, created on a post-shipment order (Shipped,Delivered). You can submit several gestures with the same or differentreason. Ifreason = Other,reasonDetailsbecomes mandatory. Example payload:
  {
    "orderId": "01210525142759UT8E",
    "reason": "MissingProduct",
    "reasonDetails": "The product is missing",
    "amount": 12.51
  }
This API is used to create an order commercial gesture.
The processing of commercial gestures is asynchronous.
Requests will be created, and if any of the functional rules are not met, they will be rejected.
Use /order-commercial-gesture-requests to check the status of the request
Functional Rules:
-
You can request a commercial gesture on a post-shipment order (
Shipped,Delivered) -
You can request multiple order commercial gesture with the same or different
reason -
If the
reasonproperty is set toOther, thereasonDetailsproperty becomes mandatory and must be provided to describe why this commercial gesture is being submitted. -
You can request a commercial gesture for orders that the sales channel has chosen to enable this option, use
/sales-channel-commercial-gesture-configurations/{salesChannelId}to check if this option is enabled. -
The maximum total amount of commercial gestures on an order depends on the sales channel configuration, use
/sales-channel-commercial-gesture-configurations/{salesChannelId}to check the available maximum gesture amount. -
The sales channel can choose a maximum rate and a maximum amount over the price of the order. The commercial gesture limit is the maximum amount between the specified fixed amount added to the order amount and the specified rate of the order amount.
Example:
Sales channel configuration: maximumAmount = €20, maximumRate = 120% Order amount (selling price shipping fees included) = €18. Max commercial gesture = Max ((18 + 20), (18 * 120% )) = Max (38, 21.6) = €38`
- The maximum total amount of commercial gestures does take into consideration the status of the order. If an order line is
Cancelled, its price is not taken into account in the calculation of the order amount.
Example:
Order line 1 amount = €10 and Order line 2 (Cancelled) amount = €10. Order amount = €10 (line 1) + €0 (line 2) = €10`
- In case of a Cdiscount order the maximum allowable commercial gesture amount will include refunds, and may not match with the commercial gestures sum.
- The commercial gesture currency matches that of the sales channel, use
/sales-channel-commercial-gesture-configurations/{salesChannelId}to check your sales channel currency. - Once the commercial gesture request is accepted, the amount of the commercial gesture will be deducted from your available balance
Endpoint full URL: https://api.octopia-io.net/seller/v2/order-commercial-gesture-requests
Parameters - Headers
| Name | In | Type | Description |
|---|---|---|---|
| SellerId* | header |
string
|
Octopia Seller Identifier. Example : 98979 |
Request body
|
The order and reason for commercial gesture application/json |
Response codes
201 - Successful response after creating a commercial gesture requestapplication/json |
||||||||||||||||||||||||||||||||||
400 - Bad Requestapplication/problem+json |
||||||||||||||||||||||||||||||||||
401 - Unauthorizedapplication/problem+json |
||||||||||||||||||||||||||||||||||
403 - Forbiddenapplication/problem+json |
||||||||||||||||||||||||||||||||||
500 - Server Errorapplication/problem+json |
-
6.4 Track the request — processing is asynchronous: use
GET /order-commercial-gesture-requeststo check the status. Requests that don’t meet the functional rules are rejected.
This API is used to retrieve commercial gesture requests.
Functional Rules:
-
The default sort is descending on
updatedAt. -
You can use the
cursorto navigate through the data.
Example:
-
To retrieve another page of commercial gesture requests for order
01210525142759UT8E:/order-commercial-gesture-requests?orderId=01210525142759UT8E&cursor=c29ydDpkZXNjJmluY2x1ZGVfaXRlbT10cnVlJmlkPTE2ODIwNzA2Mzk=
Endpoint full URL: https://api.octopia-io.net/seller/v2/order-commercial-gesture-requests
Parameters - Headers
| Name | In | Type | Description |
|---|---|---|---|
| SellerId* | header |
string
|
Octopia Seller Identifier. Example : 98979 |
Parameters - Query
| Name | In | Type | Description |
|---|---|---|---|
| limit | query |
integer
|
The amount of commercial gesture to retrieve. Default to 100. Default : 100 Example : 100 |
| cursor | query |
string
|
Pagination cursor. Use together with Example : eyJDdXJzb3JUeXBlIjoyLE9mZmVyVGVjaG5pY2FsSWQiOiIxMjM0NTZfQUFBQkI2MTEyM182X0NESVNGUiJ9 |
| orderId | query |
string
|
The order unique identifier in Octopia's system. Example : 54hgfioazlk1297867 |
| status | query |
string|enum
|
The commercial gesture status Example : InProgress Available values : ["InProgress", "Rejected", "Done"] |
| createdAtMin | query |
string
|
The created at minimum date of the ressource. Example : 2023-12-25T14:30:00Z |
| createdAtMax | query |
string
|
The created at maximum date of the ressource. Example : 2023-12-25T15:30:00Z |
| updatedAtMin | query |
string
|
The updated at minimum date of orders. Example : 2023-12-25T14:30:00Z |
| updatedAtMax | query |
string
|
The updated at maximum date of orders. Example : 2023-12-25T15:30:00Z |
Response codes
200 - Successful response with a list of commercial gesture requestsapplication/json
|
||||||||||||||||||||||||||||||||||||||||||||||||||
400 - Bad Requestapplication/problem+json |
||||||||||||||||||||||||||||||||||||||||||||||||||
401 - Unauthorizedapplication/problem+json |
||||||||||||||||||||||||||||||||||||||||||||||||||
403 - Forbiddenapplication/problem+json |
||||||||||||||||||||||||||||||||||||||||||||||||||
500 - Server Errorapplication/problem+json |
Important note: the maximum total amount of gestures on an order depends on the sales channel configuration (a max amount and a max rate; the limit is the higher of the two computations). A Cancelled order line’s price is not counted in the order amount used for that calculation.
Links: Technical documentation
7. Customer relationship management – discussions on orders
In this section we’ll see how to communicate about an order: open a thread, attach files, reply, and manage your message queue.
Goal: handle customer communication efficiently and identify request participants and which messages to prioritize.
-
7.1 Check whether you can initiate a discussion —
GET /sales-channel-configurations/{salesChannelId}:isEnabled+allowedReceivers. On some channels, only the customer can initiate a conversation.This is not a per-seller configuration or an api restriction. It exclusively depends of a marketplace operator’s choice.
Use this endpoint before initiating a discussion to get the sales channel configuration, serving the following functions:
-
Identify whether the sales channel allows or disallows the seller to initiate a discussion.
-
Identify recipients eligible for the seller when initiating a discussion.
Functional Rules:
- You can only get the configuration of one sales channel at a time, to get multiple configuration use
GET /sales-channel-configurations
Example:
Get sales channel configuration by identifier SALESC: /sales-channel-configurations/SALESC
Endpoint full URL: https://api.octopia-io.net/seller/v2/sales-channel-configurations/{salesChannelId}
Parameters - Headers
| Name | In | Type | Description |
|---|---|---|---|
| SellerId* | header |
string
|
Octopia Seller Identifier. Example : 98979 |
Parameters - Path
| Name | In | Type | Description |
|---|---|---|---|
| salesChannelId* | path |
string
|
The sales channel identifier Example : SELLZZ |
Response codes
200 - Successfully retrieved the sales channel configurationapplication/json |
||||||||||||||||||
401 - Unauthorizedapplication/problem+json |
||||||||||||||||||
403 - Forbiddenapplication/problem+json |
||||||||||||||||||
404 - Not Foundapplication/problem+json |
||||||||||||||||||
500 - Server Errorapplication/problem+json |
-
7.2 Retrieve valid (sub)typologies —
GET /typologies: combination of salesChannel + typologyCode + orderStatus. Only offer the available subtypologies for the corresponding use case, see state:true
Use this route to search discussion subtypologies.
Functional Rules:
- You can specify multiple sales channels with comma separated values but the filter will match typologies with both sales channel
Example:
Retrieve typologies with typology code order and sales channel SELLZZ:
/typologies?salesChannel=SELLZZ&typologyCode=Order&orderStatus=Shipped
Endpoint full URL: https://api.octopia-io.net/seller/v2/typologies
Parameters - Headers
| Name | In | Type | Description |
|---|---|---|---|
| SellerId* | header |
string
|
Octopia Seller Identifier. Example : 98979 |
Parameters - Query
| Name | In | Type | Description |
|---|---|---|---|
| salesChannel* | query |
array[string]
|
The sales channel. Example : List: ["SELLZZ", "CDISFR"] |
| orderStatus | query |
array[string|enum]
|
The order status for which the typology is allowed. To specify multiple statuses, separate them with commas. Example Default : Delivered Example : List: ["Delivered", "Shipped"] Available values : ["Processing", "WaitingAcceptance", "Accepted", "Refused", "InPreparation", "Shipped", "Delivered", "Cancelled", "Rejected"] |
| typologyCode* | query |
string|enum
|
The typology of discussion. Default : order Available values : ["order", "offer", "Order", "Offer"] |
| userType | query |
array[string|enum]
|
The type of user that is allowed to open a discussion with this sub-typology. You can specify multiple user types by separating them with commas. Example Available values : ["Seller", "Customer"] |
Response codes
200 - Successfully retrieved matching subtypologiesapplication/json |
||||||||||||||||||||||||||||||||||
400 - Bad Requestapplication/problem+json |
||||||||||||||||||||||||||||||||||
401 - Unauthorizedapplication/problem+json |
||||||||||||||||||||||||||||||||||
403 - Forbiddenapplication/problem+json |
||||||||||||||||||||||||||||||||||
500 - Server Errorapplication/problem+json |
-
7.3 Open a discussion —
POST /discussions: subject (5–50 chars), body (13–5000 chars), subtypology, receiver. Example payload:{ "subject": "Broken product", "orderId": "SALESC123456789", "salesChannel": "SALESC", "subtypologyCode": "broken-product", "productId": "pm5972a", "message": { "body": "product received is broken", "receiver": "Customer" } }
Use this API to create a new discussion.
The discussion can be created if only the sales channel activates the functionality for the seller to initiate a discussion.
It is preferable to use the exact sub-typology spelling that matches the spelling in the GET /typologies endpoint.
This will help you retrieve your discussion when filtering with sub-typology.
Functional Rules:
-
The discussion should be created with the sub-typology for the seller.
-
The discussion is limited to one per sub-typology per order or product from order.
-
Multiple discussions with different sub-typologies can be created.
-
The maximum attachments per message cannot exceed 3 attachments.
-
The maximum attachments size per message cannot exceed 4 MB.
-
The character length of the subject should be a minimum of 5 chars and a maximum of 50 chars.
-
The character length of the message body should be a minimum of 13 chars and a maximum of 5000 chars.
Example:
To create a new discussion use /discussions
Endpoint full URL: https://api.octopia-io.net/seller/v2/discussions
Parameters - Headers
| Name | In | Type | Description |
|---|---|---|---|
| SellerId* | header |
string
|
Octopia Seller Identifier. Example : 98979 |
Request body
|
Create discussion application/json |
Response codes
201 - Createdapplication/json |
||||||||||||||||||||||
400 - Bad Requestapplication/problem+json |
||||||||||||||||||||||
409 - Conflictapplication/problem+json
|
||||||||||||||||||||||
401 - Unauthorizedapplication/problem+json |
||||||||||||||||||||||
403 - Forbiddenapplication/problem+json |
||||||||||||||||||||||
500 - Server Errorapplication/problem+json |
-
7.4 Add an attachment — max 3 attachments per message, 4 MB total, formats PDF/JPG/PNG/DOC/XLS… (upload). Note:
heic/heifreadable on retrieval on CDISFR but not yet accepted on upload. Attachments are passed in theattachmentsarray of a discussion or a message; each carries the file as base64. Example fragment (inside aPOST /discussionsorPOST /messagesbody):"attachments": [ { "content": "UmVhZG1lIAp0aGlzIGlzIGp1c3QgYW4gZXhhbXBsZSBmb3IgYmFzZTY0IGZpbGUu", "name": "invoice", "fileFormat": "pdf" } ] -
7.5 Reply in a discussion —
POST /messages: adds a new message to an existing discussion. Required fields:body,discussionId,receivers,salesChannel. Functional rules: thebodymust be 12–1500 characters (note: this differs from the 13–5000 range at discussion creation), max 3 attachments per message and 4 MB total, and the receiver’suserIdis optional (it is resolved from the discussion context when omitted). Example payload:{ "discussionId": "507f1f77bcf86cd799439011", "salesChannel": "SELLZZ", "body": "Here is the tracking link for your replacement parcel.", "receivers": [ { "userType": "Customer" } ], "attachments": [ { "content": "UmVhZG1lIAp0aGlzIGlzIGp1c3QgYW4gZXhhbXBsZSBmb3IgYmFzZTY0IGZpbGUu", "name": "tracking", "fileFormat": "pdf" } ] }
Use this route to add a new message in an existing discussion.
Functional Rules:
-
The maximum attachments per message cannot exceed 3 attachments.
-
The maximum attachments size per message cannot exceed 4 MB.
-
Providing a
userIdfor a receiver is optional.
Example:
To create a message use /messages
Endpoint full URL: https://api.octopia-io.net/seller/v2/messages
Parameters - Headers
| Name | In | Type | Description |
|---|---|---|---|
| SellerId* | header |
string
|
Octopia Seller Identifier. Example : 98979 |
Request body
|
application/json |
Response codes
201 - Successfully created the messageapplication/json |
||||||||||||||||
400 - Bad Requestapplication/problem+json |
||||||||||||||||
401 - Unauthorizedapplication/problem+json |
||||||||||||||||
403 - Forbiddenapplication/problem+json |
||||||||||||||||
409 - Conflictapplication/problem+json |
||||||||||||||||
500 - Server Errorapplication/problem+json |
-
7.6 Know who should reply / prioritize — use:
-
receiver/userType(Customer,Seller,GrcOperator) to know who a message is addressed to. -
hasReadfor read/unread indicators. -
graduation(Discussion,Claim,Level_1) to prioritize (a Claim/Level_1 escalation = possible GRC intervention). -
processStatus(ToTreat/Treated) andGET /discussions/countto manage the queue (e.g. how many open claims to handle).
-
-
7.7 Mark as read / close —
PATCH /messages/{id}(hasRead),PATCH /discussions/{id}(isOpen: false). Both take a patch array with thereplaceoperation only. Mark a message as read:[ { "opt": "replace", "path": "/hasRead", "value": "true" } ]Close a discussion:
[ { "opt": "replace", "path": "/isOpen", "value": "false" } ]
This route allows you to replace properties in the message object.
Fonctional rules:
-
You can only patch the
hasReadproperty, which expects a boolean value -
You can only use the
replaceoperation
Example:
Flag a specific message as read: /messages/21554654retregf6548
With body
  [
    { "opt": "replace", "path": "/hasRead", "value": "true" }
]Endpoint full URL: https://api.octopia-io.net/seller/v2/messages/{messageId}
Parameters - Headers
| Name | In | Type | Description |
|---|---|---|---|
| SellerId* | header |
string
|
Octopia Seller Identifier. Example : 98979 |
Parameters - Path
| Name | In | Type | Description |
|---|---|---|---|
| messageId* | path |
string
|
The identifier of the message you want to modify Example : 601ac4eca034005ec47c29e5 |
Request body
|
The update payload to flag a message as read or not read application/json |
Response codes
204 - Success - No content |
||||||||||||||||
400 - Bad Requestapplication/problem+json |
||||||||||||||||
401 - Unauthorizedapplication/problem+json |
||||||||||||||||
403 - Forbiddenapplication/problem+json |
||||||||||||||||
404 - Not foundapplication/problem+json |
||||||||||||||||
500 - Server Errorapplication/problem+json |
Important note: only one discussion is allowed per (order, subtypology, product) — a duplicate returns 409 with the location of the existing discussion.
Links: Discussions Management
8. Generate and submit an invoice
In this section we’ll see how to build a customer invoice from order data and attach it to an order — single upload or bulk from an ERP.
Goal: produce compliant customer invoices and attach them reliably, whether one at a time or in bulk from your ERP.
-
8.1 Generate the invoice file — the API does not generate invoices. Build the PDF or UBL 2.1 XML from
GET /orders(billing identitybillingAddress,lines[], prices, taxes,currencyCode) and verify amounts withGET /operations.-
Clearly separate customer invoice data from seller settlement data (commissions, fees) which may not appear on the customer invoice.
-
-
8.2 Submit an invoice (single order) —
POST /orders/{orderId}/invoice-documents(multipart/form-data). Ideal for a one-off correction: a new upload replaces the existing invoice. Example request (multipart, one or more files):
  POST {{baseUrl}}/orders/SCID123456789/invoice-documents
  Content-Type: multipart/form-data

  file1=@SCID123456789.pdf
Please note: Availability of this feature is currently limited and not compatible with all saleschannels or order types.
Upload file(s) as the invoice for a given order.
Functional rules:
-
The files may be in the following format: PDF, XML (UBL2.1 format), ZIP containing the above
-
If an order already had invoice documents, they will be replaced with the newly provided files.
-
This route will return
201and create an invoice report as long as the request is valid, the detail of whether or not the upload succeed will be returned in the response body.
Example:
To upload invoice documents for the order with orderId SCID123456789:
/orders/SCID123456789/invoice-documents
Endpoint full URL: https://api.octopia-io.net/seller/v2/orders/{orderId}/invoice-documents
Parameters - Headers
| Name | In | Type | Description |
|---|---|---|---|
| SellerId* | header |
string
|
Octopia Seller Identifier. Example : 98979 |
Parameters - Path
| Name | In | Type | Description |
|---|---|---|---|
| orderId* | path |
string
|
The order unique identifier in Octopia's system. Example : SCID123456789 |
Response codes
201 - Successful response after uploading invoice documents for an order, import will begin shortlyapplication/json |
||||||||||||||||||||||||||||||||||||||
400 - The payload does not match the expected format or no order exists for the specified idapplication/problem+json |
||||||||||||||||||||||||||||||||||||||
401 - Unauthorizedapplication/problem+json |
||||||||||||||||||||||||||||||||||||||
403 - Forbiddenapplication/problem+json |
||||||||||||||||||||||||||||||||||||||
500 - Internal server errorapplication/problem+json |
-
8.3 Submit in bulk —
POST /order-invoice-imports: batch from ERP. The order is identified by the file name (= order identifier); ZIP accepted (unpacked, each file processed individually). Example request (multipart, each file named after its order — or a single ZIP):
  POST {{baseUrl}}/order-invoice-imports
  Content-Type: multipart/form-data

  file1=@SCID123456789.pdf
  file2=@SCID987654321.pdf
The response returns an importId — poll GET /order-invoice-imports/{importId} for the per-file result.
Please note: Availability of this feature is currently limited and not compatible with all saleschannels or order types.
Upload file(s) as the invoice for multiple orders.
Functional Rules:
-
The files may be in the following format: PDF, XML (UBL2.1 format), ZIP containing the above
-
If an order already had invoice documents, they will be replaced with the newly provided files.
-
This route will return
201and create an import report as long as the request is valid, the detail of whether or not the upload succeed will be available via the/order-invoice-importsendpoint. -
The file name must be a valid order identifier. If a zip is provided, then the inner file name must be a valid order identifier.
Example:
-
To upload invoice files for multiple orders:
/order-invoice-imports
Endpoint full URL: https://api.octopia-io.net/seller/v2/order-invoice-imports
Parameters - Headers
| Name | In | Type | Description |
|---|---|---|---|
| SellerId* | header |
string
|
Octopia Seller Identifier. Example : 98979 |
Response codes
201 - The result of the upload. Each file will have an entry with the name property matching the multipart request name property.application/json |
||||||||||||||||||||||||||||||||||||||
400 - Bad Requestapplication/problem+json |
||||||||||||||||||||||||||||||||||||||
401 - Unauthorizedapplication/problem+json |
||||||||||||||||||||||||||||||||||||||
403 - Forbiddenapplication/problem+json |
||||||||||||||||||||||||||||||||||||||
500 - Internal server errorapplication/problem+json |
-
8.4 Track processing — asynchronous upload: the
importIdlets you trackstatus(Running/Success/PartialSuccess/Failure) andintegrationStatus(OrderCheck, FileCheck, FileExtract, FileUpload, Done, Failure). -
8.5 Correct / replace an invoice — a new upload for the same order automatically replaces the previous invoice.
Important note: don’t consider the upload successful on the 201 alone — it confirms acceptance, not final processing. Check the returned status. Also, this feature is partially available depending on sales channels / order types.
Links: Orders Invoices
9. Retrieve your financial data
In this section we’ll see how to retrieve the financial data tied to your orders and payments.
Goal: reconcile your accounting reliably by retrieving sales, commissions, refunds and their payment states.
-
9.1 Query operations
GET /operations is the entry point for everything money-related on an order: the sale itself, its VAT breakdown, the marketplace commission, refunds, service fees and guarantee-reserve movements.
-
Required filter — at least one of:
orderReference(one order),invoiceId(one invoice), or a full date range (paidAtMin+paidAtMax, orchangedAtMin+changedAtMax). -
Dates for reconciliation — each operation carries
createdAt,acceptedAt,shippedAt,paidAt,refundedAt,releasePaymentDate. -
Also returned —
paymentState,currency, the relatedinvoiceId, and theeventTypesit covers. -
Cadence — once per payout to reconcile; daily if you want continuous monitoring.
Allows you to:
-
Retrieve all financial informations related to a payment (order, commissions, invoices, guarantee reserve...).
-
Search for a financial operation (order/refund) and retrieves its details.
Functional Rules:
-
Default
PageSize: 20 -
At least one of these filters is required:
orderReference,invoiceId, or a full date range (paidAtMin+paidAtMaxorchangedAtMin+changedAtMax). -
Recommended call frequency:
On each payout in order to reconcile accouting items.
-
The following fields display the gross amount (VAT included): sales, refunds, commissions, and service financial flow.
Examples:
-
Retrieve all operations paid between two dates:
/operations?paidAtMin=2021-09-01&paidAtMax=2021-09-15 -
Retrieve all operations linked to a specific order:
/operations?orderReference=1601302358PGI56 -
Retrieve all operations linked to a specific invoice and a specific event type:
/operations?invoiceId=1400178408&eventType=Refund,Commission
Endpoint full URL: https://api.octopia-io.net/seller/v2/operations
Parameters - Headers
| Name | In | Type | Description |
|---|---|---|---|
| SellerId* | header |
string
|
Octopia Seller Identifier. Example : 98979 |
Parameters - Query
| Name | In | Type | Description |
|---|---|---|---|
| pageIndex | query |
integer
|
The index of the page (Min: 1 / Max: 100) Default : 1 Example : 1 |
| pageSize | query |
number
|
The maximum number of elements in a page. (Min: 1 / Max: 100) Default : 20 Example : 10 |
| orderReference | query |
string
|
External reference of the order used by the sales channel to communicate with the customer. Example : 1601302358PGI56 |
| paidAtMin | query |
string
|
Minimum payment date - Expected date-time at ISO 8601 format (UTC as default time-zone) It also requests to complete the filter Example : 2024-05-27T00:00:00Z |
| paidAtMax | query |
string
|
Maximum payment date - Expected date-time at ISO 8601 format (UTC as default time-zone) It also requests to complete the filter Example : 2024-09-27T23:59:59Z |
| eventTypes | query |
array[string|enum]
|
Operation type Example : List: ["Refund"] Available values : ["Sale", "Commission", "Refund", "CommissionRestitution", "Subscription", "CdiscountServices", "LogisticFee", "SecurityDeposit", "FfmOrdersReturns", "FfmStorage", "FfmShippingCost", "SplittedPaymentFees", "TradeMarketingFees", "AgecLawFees"] |
| states | query |
array[string|enum]
|
Payment status of the financial operation Example : List: ["Paid"] Available values : ["NotPayable", "Estimated", "Paid", "Blocked", "InProcess"] |
| invoiceId | query |
integer
|
Invoice ID Example : 1801067043 |
| changedAtMin | query |
string
|
Minimum date of last change - Expected date-time at ISO 8601 format (UTC as default time-zone). It also requests to complete the filter Please combine this filter with another to secure the request performance. Example : 2024-05-27T00:00:00Z |
| changedAtMax | query |
string
|
Maximum date of last change - Expected date-time at ISO 8601 format (UTC as default time-zone). It also requests to complete the filter Please combine this filter with another to secure the request performance. Example : 2024-09-27T23:59:59Z |
| salesChannelId | query |
string
|
The Unique identifier of the sales channel the data comes from Example : CDISFR |
Response codes
200 - Successapplication/json
|
||||||||||||||||||||||||||||||||||||||||||||||||||||||||||||||||||||||||||||||||||||||||||||||||||||||||||||||||||||||||||||||||||
400 - Bad Requestapplication/problem+json |
||||||||||||||||||||||||||||||||||||||||||||||||||||||||||||||||||||||||||||||||||||||||||||||||||||||||||||||||||||||||||||||||||
401 - Unauthorizedapplication/problem+json |
||||||||||||||||||||||||||||||||||||||||||||||||||||||||||||||||||||||||||||||||||||||||||||||||||||||||||||||||||||||||||||||||||
403 - Forbiddenapplication/problem+json |
||||||||||||||||||||||||||||||||||||||||||||||||||||||||||||||||||||||||||||||||||||||||||||||||||||||||||||||||||||||||||||||||||
404 - Not Foundapplication/problem+json |
||||||||||||||||||||||||||||||||||||||||||||||||||||||||||||||||||||||||||||||||||||||||||||||||||||||||||||||||||||||||||||||||||
500 - Internal Server Errorapplication/problem+json |
-
9.2 Understand operation types
The eventTypes array tells you what a line represents:
-
Sales cycle —
Sale,Commission,Refund,CommissionRestitution(commission given back when an order is refunded). -
Services & logistics —
Subscription,CdiscountServices,LogisticFee,SecurityDeposit,FfmOrdersReturns,FfmStorage,FfmShippingCost, plusSplittedPaymentFees,TradeMarketingFees,AgecLawFees.
Filter on eventTypes to isolate a family (e.g. eventTypes=Refund,Commission to audit refunded orders), then read the matching sub-objects on each operation: sale, refund, commission, commissionsDetail, serviceFinancialFlow.
-
9.3 Track payment state
states reflects where the money is in the payout cycle:
-
NotPayable— past due but not paid. -
Estimated— planned for an upcoming payout (typically the 1st, 11th or 21st). -
InProcess— being paid during the current day. -
Paid— settled. -
Blocked— held because the seller’s payments are blocked.
Filter on states to build dashboards — e.g. states=Estimated for expected incoming cash, states=Blocked to surface what needs attention.
-
9.4 Reconcile
Call GET /operations (and GET /payments) on each payout to match what Octopia paid against your own accounting.
-
Amounts are gross (VAT included) for sales, refunds, commissions and service financial flows — the VAT portion is broken out separately (see the workflow below) so you can rebuild the net amounts.
-
GET /payments— payout-level view, grouped by date, sales channel and payment status. -
GET /invoices/{invoiceId}/details— line-by-line content of a specific invoice.
Practical example — “How do I gather the data to build my invoice?”
The API doesn’t generate the customer invoice for you (see section 8): you build it from order data, then confirm the figures against the financial operations.
-
Get the order content and billing identity —
GET /orders/{orderId}(orGET /orders): readbillingAddress(name, company,companyVatNumber,companyRegistrationNumber, country), thelines[](each withoffer.productTitle,quantity,sellingPrice.unitSalesPrice,sellingPrice.shippingCost), the per-linetaxes[](code,amount,rate), the ordercurrencyCodeandtotalPrice. This is what goes on the customer invoice. -
Confirm the money actually settled —
GET /operations?orderReference={reference}: cross-check thesalesub-object (productAmount,shippingFeesAmount,processingFeesAmount,total) and its VAT breakdown invatSale. If the order was refunded, do the same withrefund/vatRefund. -
Separate customer-facing vs seller-settlement figures —
commission(+commissionsDetail),creditOnCommissionandserviceFinancialFloware what Octopia charges you; they generally do not appear on the customer invoice. Keep them for your own accounting.
VAT — France vs outside France. Amounts are gross (VAT included), with VAT broken out (vatSale, vatRefund) so you can derive the net. Per line, taxes[] gives code, rate, amount; currencyCode, billingAddress.countryCode and companyVatNumber flag the case (domestic FR, intra-EU B2B, export). The API gives the figures and flags — it doesn’t decide the fiscal treatment (rate, reverse-charge, invoice wording): confirm those with your finance team. Not tax advice.
Commissions & fees. The commission is gross in commission, itemised in commissionsDetail[] (product commission, commission4x, interetBca…), and refunded via creditOnCommission / a CommissionRestitution event. Logistics and service costs come as their own eventTypes (LogisticFee, FfmStorage, FfmShippingCost, SecurityDeposit, …), not inside the sale. For the invoices Octopia issues to you, use GET /invoices/{invoiceId}/details and GET /invoices/{invoiceId}/documents (PDF).
Links: Financial Management